
|
Use a Gedcom file to produce webpages |
1. Download a Tree as a Gedcom
A Gedcom file can be downloaded from a family tree on Ancestry.com by clicking the Download Gedcom button.
A Gedcom file can be downloaded from a family tree on Ancestry.com by clicking the Download Gedcom button.
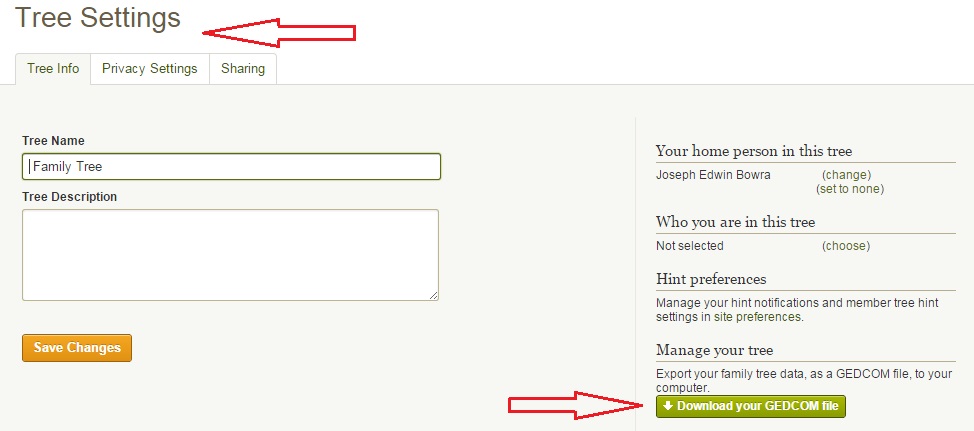
Download the tree as a Gedcom file
2. Download a Webpage Making Program
3. Generate Web Pages
- Download Ged-Gen from http://www.ged-gen.com/.
- Specify a folder in (C: Drive) in which to install it, like C:\GED-GEN. (Newer versions of Windows restrict programs from creating files in the "Program Files" folder, where GED-GEN installs by default and will produce a "File Not Found" when generating webpages. If you install it to C:\GED-GEN, it will be able to create the webpage files).
- Create another Folder in C:\GED-GEN called "Public_html".
3. Generate Web Pages

Shortcut
|
Open the Gen-Ged Desktop Shortcut.
Click Options - see the following images for instructions |

Click Options and browse for the files in C: Drive. Do not change the Options Set
Go the Headers Tab then select Family Pages on the smaller inserted Tabs and, click boxes as shown below.

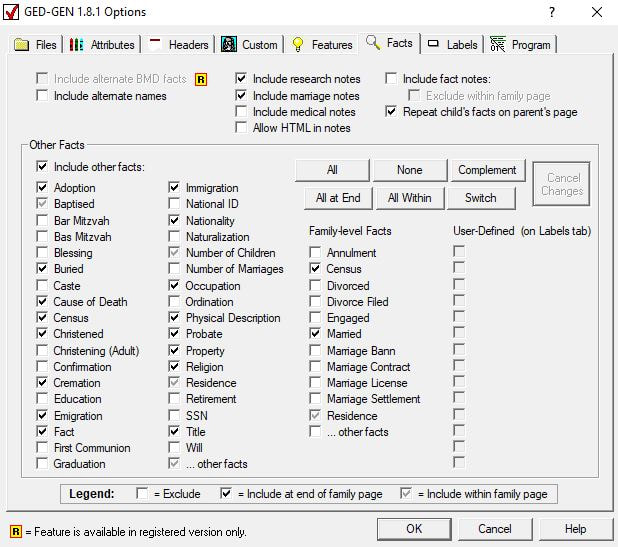
Next select the Facts Tab and click boxes as shown below.
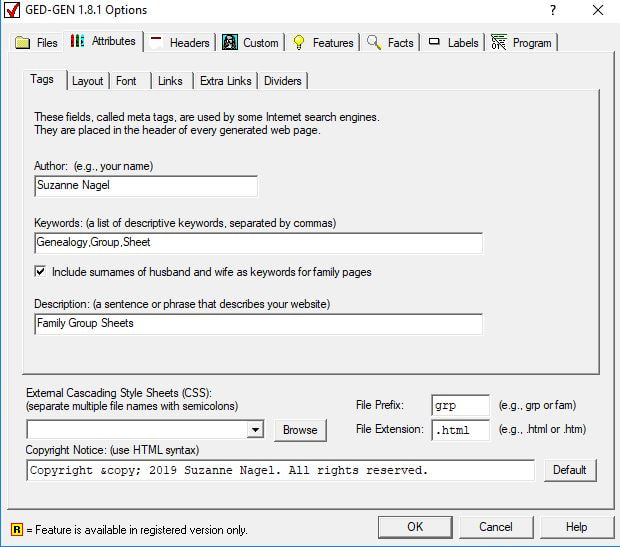
Next select the Attributes Tab and fill out the inner tab boxes with your own information and tick boxes as shown below.
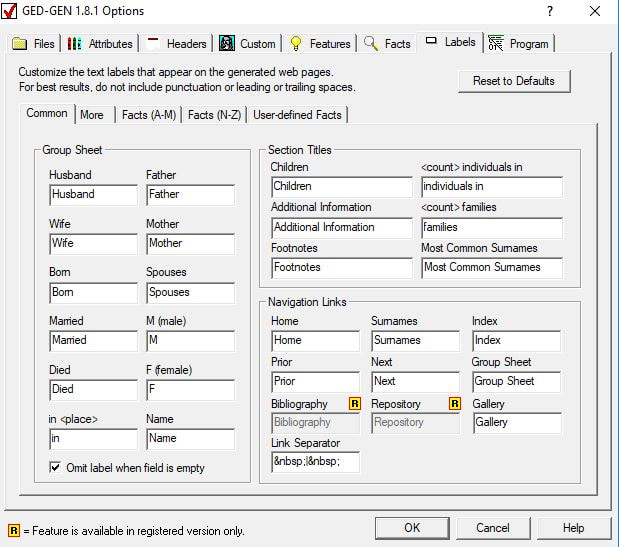
Next go to the Labels Tab and the inner tab marked Common and check boxes have the following information as shown below.
Next go to the Features Tab and select the smaller inner Privacy Filters tab and make selections and write the date '1910'' as shown below. The Privacy Filters are important, tests have been conducted on this Tab to ensure the best result.

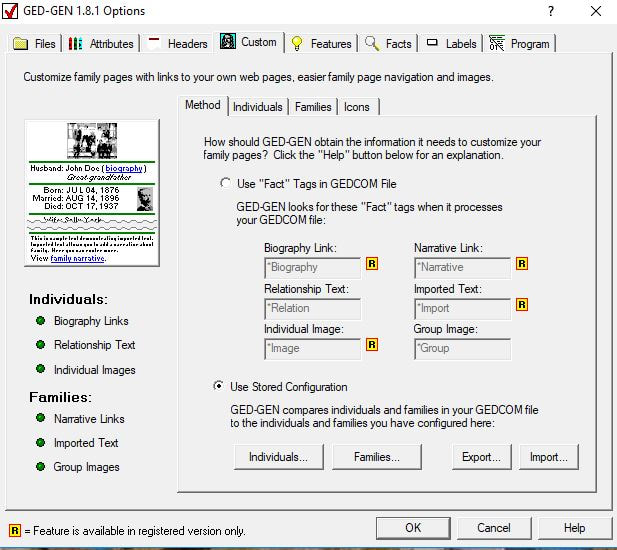
Next go to the Custom Tab and ensure the 'Use Stored Configuration' is selected as shown below.
Click OK and then Generate followed by View your webpages. Check the information is the way you want it presented. If you wish to make changes click Options and make the changes before selecting Generate and View. The files are overwritten each time in the Public_html folder.

|
Upload to Host Website |
3. Uploading to Host Website
Choose a hosting provider such as HostGator or Crazy Domains and upload your files.
When you are ready to transfer your web pages to your website at the ISP, you will generally use a File Transfer Protocol (FTP) program. FTP is a way of transferring files over the Internet eg Filezilla
User websites can be seen here http://www.ged-gen.com/links.html.
To add Gen-Ged logo to your website/webpage
1. Go to http://www.ged-gen.com/links.html and save the logo image at the bottom of the page to your computer.
2. Upload the logo image to http://www.sslpic.com/.
3. Download the image URL and past it into the coding below
4. (Or simply copy the entire coding below)
<div >
<a href="http://ged-gen.com" title="GED-GEN Family Tree Websites">
<img src="https://static.e-junkie.com/sslpic/148382.e0688509940ac50fa71a4a5616bb5061.jpg"
alt="GED-GEN Family Tree Websites"
title="GED-GEN Family Tree Websites" /></a>
</div>

|
Use a free platform to host Gen-Den files |
This is suitable for small Gen-Ged families only and is complicated at best.
|
Layout Styles
|

Notepad++ with all the Gen-Ged files open
Highlight all the html in the "grpbase.css" file and past it into Designer Template / Advanced / CSS. Save Template
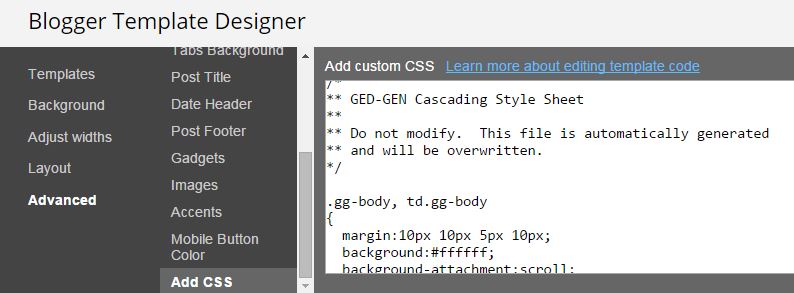
Copy the .css file into the Blogger Template
4. MAKE PAGES ON BLOGSPOT
Assign each Gen-Ged page NAME a corresponding blogger website page NAME by using Find and Replace.
Gen-Ged file name = Blogger Website Page Name
grpmain = Surnames
grpname1 = Home (or Index)
grp1 = Family 1
grp2 = Family 2
grp3 = Family 3
grp4 = Family 4
and so on...
5. EDITING THE GEN-GED FILES FOR USE ON BLOGGER
This is the tricky part. Full concentration is required. Using Notepad++ separate the head from the body in all pages. Only the body section will be uploaded to Blogger.
Assign each Gen-Ged page NAME a corresponding blogger website page NAME by using Find and Replace.
Gen-Ged file name = Blogger Website Page Name
grpmain = Surnames
grpname1 = Home (or Index)
grp1 = Family 1
grp2 = Family 2
grp3 = Family 3
grp4 = Family 4
and so on...
- Make new Blogger Pages using the new names (Surnames, Family 1, Family 2 as page names).
- Make one Post page using the name of Home (or Index).
- "View" them so you have the URL ready to copy .
5. EDITING THE GEN-GED FILES FOR USE ON BLOGGER
This is the tricky part. Full concentration is required. Using Notepad++ separate the head from the body in all pages. Only the body section will be uploaded to Blogger.
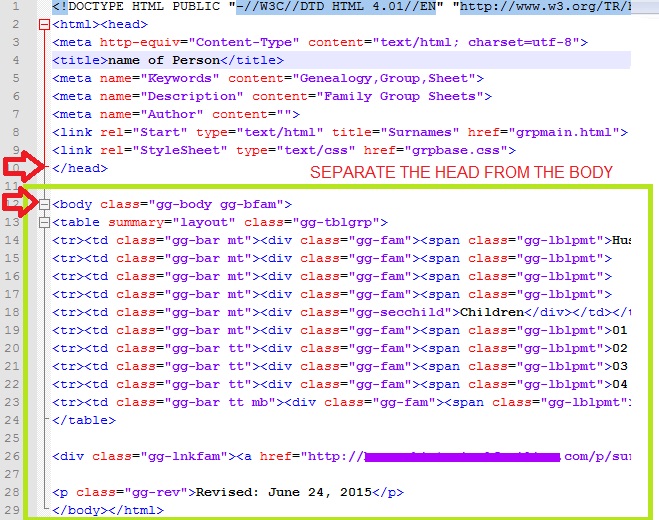
Separate the html head from the body
6. UPDATING THE LINKS
Working from the recently made Page Name List in Step 4, go the the first corresponding name and find it in Notepad++. (grpmain = Surname). Use the search feature to Find and Replace the href links on EACH page individually. Be careful not to add extra spaces. Be careful not to delete the " ".
Working from the recently made Page Name List in Step 4, go the the first corresponding name and find it in Notepad++. (grpmain = Surname). Use the search feature to Find and Replace the href links on EACH page individually. Be careful not to add extra spaces. Be careful not to delete the " ".
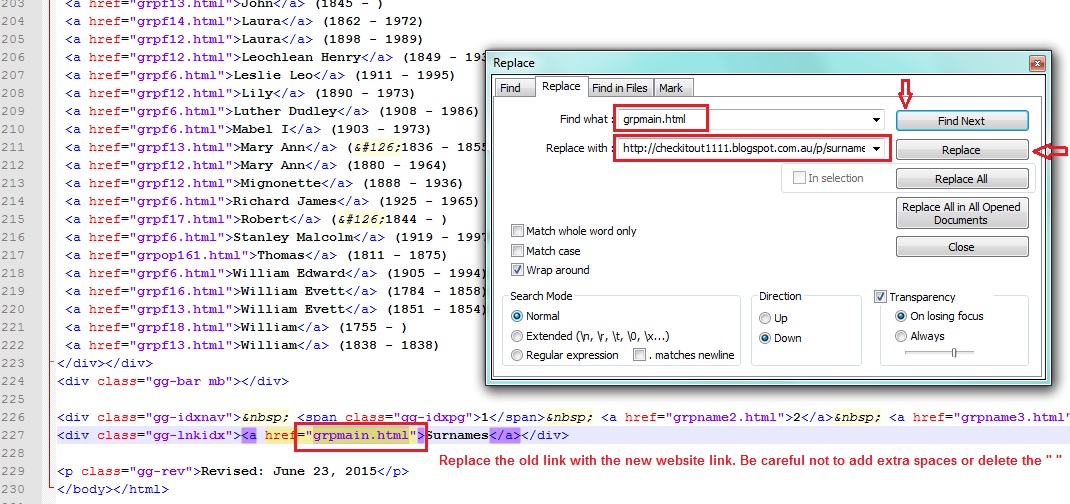
Replace the links

Copy the URL from the surname page
When every link is updated. Save the pages.
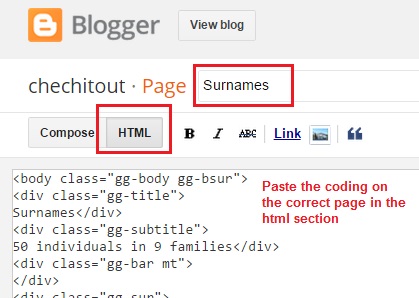
Copy the body section to the html section of the page
Copy the body section shown in Step 5 and paste it to HTML section of your page. Publish each page as you go.
|
|
|
