How to Make an Embedded Email Newsletter
in Microsoft Word & Microsoft Publisher
You do not need to have special skills, or to use a special program, to make a html newsletter embedded in the body of an email.
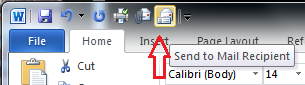
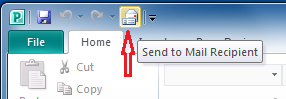
Setting up "Send to Mail Recipient"
To use this feature on the Ribbon, you must add this command to the Quick Access Toolbar. To do this, follow these steps.
|
1. On the File menu, click Options.
2. Click Quick Access Toolbar, and then click All Commands in the Choose commands from list. 3. In the list that appears, click Send to Mail Recipient, and then click Add to add the command to the Quick Access Toolbar.
|
Design your Newsletter
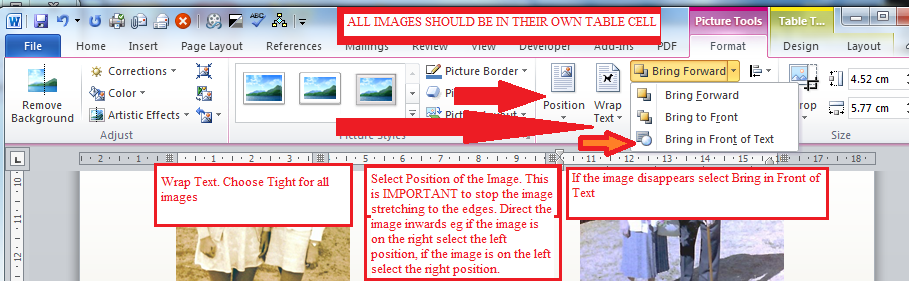
IMPORTANT - Build your newsletter in a Micrsoft Word TABLE. Format columns or sections using borders and colors. Give images their own table cell to avoid movement within the table during the .html process.
Add an Unsubscribe Option
IMPORTANT - Build your newsletter in a Micrsoft Word TABLE. Format columns or sections using borders and colors. Give images their own table cell to avoid movement within the table during the .html process.
Add an Unsubscribe Option
- If you would like to add an unsubscribe option at the end of you letter insert a bottom row without borders. Insert "You are receiving this email because you have been automatically subscribed to the newsletter ‘name of newsletter'. Not Interested? Unsubscribe here."
- Highlight Unsubscribe here.
- On the Ribbon select Insert, Hyperlink. Fill in the hyperlink Email Address with mailto:[email protected] and the 'Text to Display' with Unsubscribe Me.
- Before the final save make sure that you highlight your table and turn off ''View Gridlines" (Pic 1). Save and close.
|
Save as html document
Follow the instructions below to turn your newly created .docx newsletter into a .pdf newsletter and a .html newsletter. To avoid your webpage from distorting
|
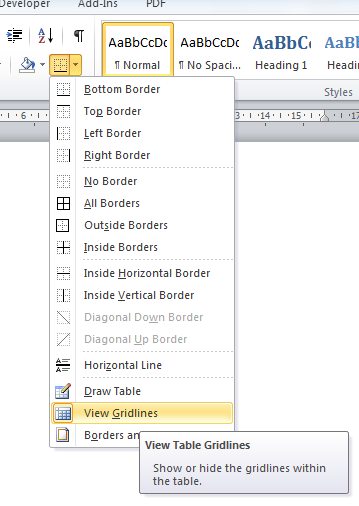
Pic 1 - Turn off 'View Gridlines'
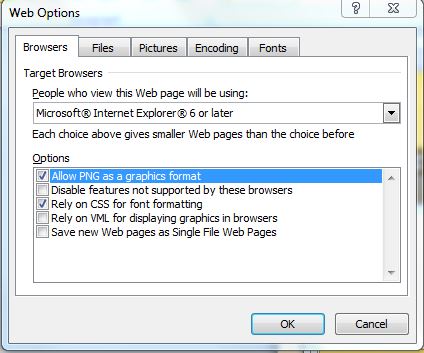
Pic 2 - Tick 'Allow PNG...' and 'Rely on CSS'
|
Pic 3 - Absolute Position set to page and tick Lock Anchor

Pic 4 - Size & Position to Absolute tick all options
|
How to Centre the Newsletter
This step is important if you want your newsletter centred within the email otherwise it will be positioned on the left.
1. Open your HTML document in Notepad or Notepad ++ or another HTML editing program like Dreamweaver
2. Find </head> and replace it with the entire text below. Be sure that you edit the </head> line and NOT the <head>
</head><table border="0" cellpadding="0" cellspacing="2" width="760"align="center"><tr><td>
3. Save and close
|
Send the Newsletter

Click to enlarge
|
Outlook (or your default provider) can easily send this email to a small group of people (50 - 100) but for larger numbers it is best to upload to a provider like YMLP or Mailchimp.
|
EMAIL NEWSLETTER WITH PRINTABLE/DOWNLOAD VERSION
This step adds another dimension to the colourful & spacious .html newsletter.
Double click on the.html document and check that the webpage is OK and your print/download link takes you to the .pdf file. How to connect Outlook 16 to Gmail with Google App password |
|
